Rich Tier Desktop will be no longer be accessible for Planning Analytics on Cloud.
Hopefully, most PA (Planning Analytics) users are aware of this notification but I thought to share this as a reminder for those who are not aware.
What are the notifications?
You have seen the notes and images across the top ribbon of PA when you log into PA….

…and on the desktops when you have logged into the backend of a PA server:

What does this mean?
As of late September, IBM will be removing RDP access to backend PA servers, meaning, no more access to the PA servers through Remote Desktop, the RDP files supplied with the PA Welcome Kits will no longer function.
Typically, users will Remote onto the backend PA servers to access files, copy data from one server to another and delete logs – all living on the ‘S: Drive’ (Data drive). All these functions will still be available using alternative methods, though Data living outside of the S:Drive will not be accessible once RDP functionality has been removed.
What are the Alternatives?
Any data on the S: Drive will still be accessible. There are two alternatives available for PA users to continue accessing log files, copying, adding, and deleting data files etc., these are, Drive Explorer and File Manager.

Use the new Drive explorer to access the S: drive (Cloud only), available in release 2.0.98 of Planning Analytics Workspace.
You can now access the S:/ drive through the Planning Analytics Workspace modelling workbench with the new Drive explorer.
Note: The Drive explorer is not available in Planning Analytics as a Service.
The Drive explorer option is visible to users with Subscription administrator access or those with permission to browse the file system.
Important: Users with access to Drive explorer have full access to the file system in the S:/ drive and the remote server. There is no access control beyond enabling the Drive explorer capability.
Click Drive explorer to open the root of the S:/ drive.
Like in the File manager, you can upload files, create folders, and select files in the Drive explorer. Selected files can be renamed, moved to a new location, copied, deleted, and compressed.
The Drive explorer has an additional capability that lets you connect to the remote server associated with your Cloud. Once connected, you can move files to a new location.
- Click Open remote server from the Drive explorer

2. Log in to your remote server with your File share credentials and click Refresh folder items to test the connection. The credentials to connect to the remote server are provided in the welcome kit for that specific Planning Analytics system.
You can now see the files on your remote server.
You can create folders here and organize files and select files to rename, delete, and move them to a new location. When you copy a file from the remote server, you can paste the file to the local S:/ drive only. You can also copy files from the S:/ drive and paste them to the remote server.
Enhancements to the File manager available in release 2.0.95 of Planning Analytics Workspace.
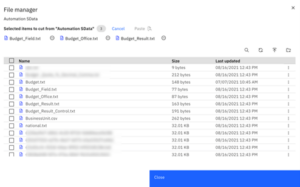
The File manager tool on the modelling workbench features several enhancements in this release that lets you easily move files around. The File manager shows a list of all the files and folders that have been uploaded to the Planning Analytics database and allows you to manage those items.
Attention: If you’re using IBM Planning Analytics Workspace Local, update the Planning Analytics Administration agent to the version that is included in Planning Analytics Workspace 2.0.95. You won’t be able to use the File manager in Planning Analytics Workspace 2.0.95 unless you update the Planning Analytics Administration agent to the version from the same release. For more information, see Planning Analytics Administration agent (local only).
The File manager in Planning Analytics Workspace now supports the following actions:
Create folders and subfolders
You can now create folders and subfolders in the File manager. If you delete a folder, subfolders or files in that folder are also deleted.
Cut, copy, and paste files
You can now move or copy files or folders to a different folder within the File manager. The Cut and Copy options display in the toolbar when you select one or more items.
To cut or copy, select one or more items and click Cut or Copy. Your selections display in alphabetical order as a horizontal list for a quick review before you cut or copy the items.

After you review the list of items that you want to cut or copy, you can paste the items to a different folder. To paste a cut or copied item, go to the destination folder and click Paste.
Compress and expand files
Select one or more files or folders and click Compress to compress the items into a .zip file. You can compress a file and move it to a new location without using Cut. To do this, select a file and click Compress. Then, go to the destination folder and click Compress again.
To expand a compressed file, select the file and click Expand. As with compressing a file to a new location, you can expand a file to a new folder.
For more information, please read the following FAQ on the IBM link below or contact Aramar Support.
Let us know your thoughts here.